🙋♂️ Customers
Track spend, set budgets for your customers.
Tracking Customer Credit
1. Make LLM API call w/ Customer ID
Make a /chat/completions call, pass 'user' - First call Works
curl -X POST 'http://0.0.0.0:4000/chat/completions' \
        --header 'Content-Type: application/json' \
        --header 'Authorization: Bearer sk-1234' \ # 👈 YOUR PROXY KEY
        --data ' {
        "model": "azure-gpt-3.5",
        "user": "ishaan3", # 👈 CUSTOMER ID
        "messages": [
            {
            "role": "user",
            "content": "what time is it"
            }
        ]
        }'
The customer_id will be upserted into the DB with the new spend.
If the customer_id already exists, spend will be incremented.
2. Get Customer Spend
- All-up spend
- Event Webhook
Call /customer/info to get a customer's all up spend
curl -X GET 'http://0.0.0.0:4000/customer/info?end_user_id=ishaan3' \ # 👈 CUSTOMER ID
        -H 'Authorization: Bearer sk-1234' \ # 👈 YOUR PROXY KEY
Expected Response:
{
    "user_id": "ishaan3",
    "blocked": false,
    "alias": null,
    "spend": 0.001413,
    "allowed_model_region": null,
    "default_model": null,
    "litellm_budget_table": null
}
To update spend in your client-side DB, point the proxy to your webhook.
E.g. if your server is https://webhook.site and your listening on 6ab090e8-c55f-4a23-b075-3209f5c57906
- Add webhook url to your proxy environment:
export WEBHOOK_URL="https://webhook.site/6ab090e8-c55f-4a23-b075-3209f5c57906"
- Add 'webhook' to config.yaml
general_settings:
  alerting: ["webhook"] # 👈 KEY CHANGE
- Test it!
curl -X POST 'http://localhost:4000/chat/completions' \
-H 'Content-Type: application/json' \
-H 'Authorization: Bearer sk-1234' \
-D '{
    "model": "mistral",
    "messages": [
        {
        "role": "user",
        "content": "What's the weather like in Boston today?"
        }
    ],
    "user": "krrish12"
}
'
Expected Response
{
  "spend": 0.0011120000000000001, # 👈 SPEND
  "max_budget": null,
  "token": "88dc28d0f030c55ed4ab77ed8faf098196cb1c05df778539800c9f1243fe6b4b",
  "customer_id": "krrish12",  # 👈 CUSTOMER ID
  "user_id": null,
  "team_id": null,
  "user_email": null,
  "key_alias": null,
  "projected_exceeded_date": null,
  "projected_spend": null,
  "event": "spend_tracked",
  "event_group": "customer",
  "event_message": "Customer spend tracked. Customer=krrish12, spend=0.0011120000000000001"
}
Setting Customer Budgets
Set customer budgets (e.g. monthly budgets, tpm/rpm limits) on LiteLLM Proxy
Quick Start
Create / Update a customer with budget
Create New Customer w/ budget
curl -X POST 'http://0.0.0.0:4000/customer/new'
    -H 'Authorization: Bearer sk-1234'
    -H 'Content-Type: application/json'
    -D '{
        "user_id" : "my-customer-id",
        "max_budget": "0", # 👈 CAN BE FLOAT
    }'
Test it!
curl -X POST 'http://localhost:4000/chat/completions' \
-H 'Content-Type: application/json' \
-H 'Authorization: Bearer sk-1234' \
-D '{
    "model": "mistral",
    "messages": [
        {
        "role": "user",
        "content": "What'\''s the weather like in Boston today?"
        }
    ],
    "user": "ishaan-jaff-48"
}
Assign Pricing Tiers
Create and assign customers to pricing tiers.
1. Create a budget
- UI
- API
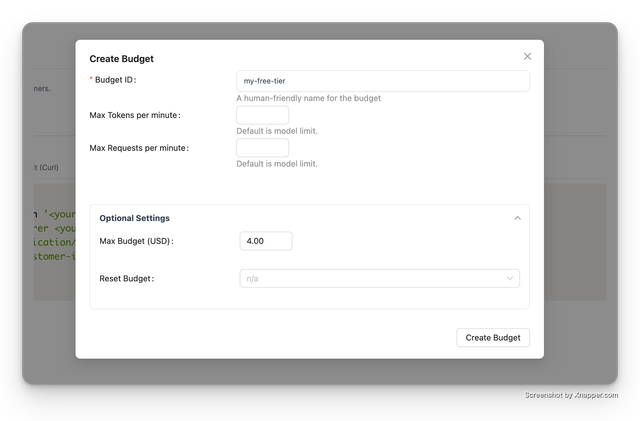
- Go to the 'Budgets' tab on the UI.
- Click on '+ Create Budget'.
- Create your pricing tier (e.g. 'my-free-tier' with budget $4). This means each user on this pricing tier will have a max budget of $4.
Use the /budget/new endpoint for creating a new budget. API Reference
curl -X POST 'http://localhost:4000/budget/new' \
-H 'Content-Type: application/json' \
-H 'Authorization: Bearer sk-1234' \
-D '{
    "budget_id": "my-free-tier",
    "max_budget": 4
}
2. Assign Budget to Customer
In your application code, assign budget when creating a new customer.
Just use the budget_id used when creating the budget. In our example, this is my-free-tier.
curl -X POST 'http://localhost:4000/customer/new' \
-H 'Content-Type: application/json' \
-H 'Authorization: Bearer sk-1234' \
-D '{
    "user_id": "my-customer-id",
    "budget_id": "my-free-tier" # 👈 KEY CHANGE
}
3. Test it!
- curl
- OpenAI
curl -X POST 'http://localhost:4000/customer/new' \
-H 'Content-Type: application/json' \
-H 'Authorization: Bearer sk-1234' \
-D '{
    "user_id": "my-customer-id",
    "budget_id": "my-free-tier" # 👈 KEY CHANGE
}
from openai import OpenAI
client = OpenAI(
  base_url="<your_proxy_base_url",
  api_key="<your_proxy_key>"
)

completion = client.chat.completions.create(
  model="gpt-3.5-turbo",
  messages=[
    {"role": "system", "content": "You are a helpful assistant."},
    {"role": "user", "content": "Hello!"}
  ],
  user="my-customer-id"
)

print(completion.choices[0].message)